

Soft Ground
with Non-Toxic Materials
Traditional Soft Ground:
- The 'traditional' soft ground was made up with a mixture of bee's wax and asphaltum. The addition of beeswax produced a soft-ground that never dried and remained malleable throughout the soft-ground imprinting and etching process. The wax characteristic that made this ground soft was also what made it difficult to manage
Materials:
- Copper Plate
- Graphic Chemical Water Based Relief Ink
- Crimson #1661
- Grease proof paper, wax paper or tracing paper
- HB pencil or ball-point pen
- Bridge for drawing
- Stop out varnish (Future Floor Wax or Speedball Screen Filler)
- Ferric Chloride Etch
- Degreasing mechanism / material for copper plate
- Etching needle
We use Graphic Chemical Crimson Water Soluble Relief Ink to create a ground which remains soft and impressionable for a period of time (12-24 hrs). This replaces traditional soft-ground which was made of beeswax and asphaltum.
Softground enables you to do these things:
- Transfer textures from soft substrates (fabric, foils, leaves etc.) onto the plate so they may be etched
- Create a line which closely resembles a soft
pencil or crayon line in thickness and texture
Prepare Plate
- Future back of plate. You need to protect the back of the plate before applying the soft ground.
- Apply Relief Ink to objects as well as plate
- Try printing plate before drying and after etching (positive and negative)
- Draw with Future to stop out other areas
- Follow basic plate preparation instructions
Apply Soft Ground:
- The best way to lay the relief soft-ground down is with a brayer. It is preferable to put several thin layers down rather than a couple of thick layers of this relief in soft-ground. The ground is removed with Comet cleanser or Fantastic cleanser.
- Roll several thin coats of Graphic Chemical Water Based Relief Ink. Use as you would a soft ground.
- This ink takes about 12 to 24 hours to naturally dry and while it is wet it can be treated in exactly the same manner as traditional soft-ground techniques.
- this soft-ground cures and hardens into a hard-ground a great variety of marks can be created as th soft-ground hardensThis hardened ink becomes progressively more brittle. So the kind of smooth line that can be drawn through this ground changes each day the Soft ground is left on the plate. The variety in line is created because the ground becomes more and more brittle; Thus smooth lines gradually turn into lines, similar to dry point, where a false burr is created as the scribe is drawn through the brittle cured ground.
Possible Soft Ground Techniques:
Impress items into Soft Ground
- Place plate on the press bed, place textural objects onto the plate.
- Place wax paper on top of items and plate with
ground
(Can use saran wrap but it will stick somewhat)
HINTS:
Be sure the plate edges are eased - Don't use objects that might cut the blankets
- Cover the plate with a sheet of grease proof paper (Wax paper, Mylar or tracing paper will do) then cover with the blankets
- Run the press through with light pressure
- Lift up the blankets and the grease proof paper, carefully pick off the object(s), leaving the impression of the texture in the ground
- Stop out areas which are not to be etched, and etch the image. Be sure the stop out is dry before etching. Hard ground can be used to protect the edges.
Method:
- You need to clean (degrease) a copper plate. This may or may not have been sanded as for hardground.
Apply Soft Ground:
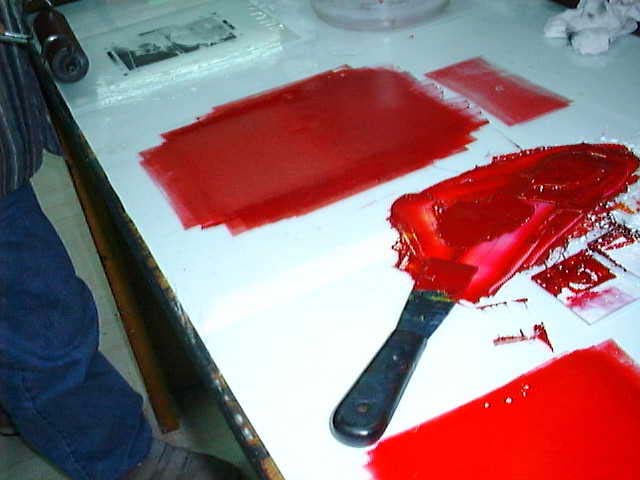
- Roll out the Graphic Chemical Crimson Water Soluble Relief Ink on an ink slab with a synthetic roller. Be sure there are no roller marks in the ground. Clean the brayer when you are finished with it.
- Roll an even layer onto your plate. The thickness of the layer will affect the quality of your finished image. Should be neither too thick nor too thin.
Apply Textural Materials:
- While the ink is still wet, put your plate on a piece of newsprint on the bed of the press. Put the textured surfaces you have chosen face down on the plate. Cover with several thicknesses of newsprint and run through the press with enough pressure to transfer the texture.
- Remove the newsprint and caefully remove your textured substrates. (this may require tweezers and patience). The texture should be apparent on the plate's surface.
- Any texture can be used; wrinkles and folds can be used. Protect the felts by covering the plate and fabric with a sheet of hard smooth paper. Adjust press pressure. Use Dickerson press to control the pressure.
Textural Materials Suggested:
- Fabric (coarse texture):
- corduroy . canvas
denim ..... burlap - Thin leaves or grass
- Fine yarn or string
- Feathers
- Tin foil
Now you have several choices of approach. You can:
- Use Future Floor Wax or Screen Filler and a brush to stop out any areas where you do NOT want texture, and then etch the plate
- Allow the softground to dry (by air or with a hair dryer) and then scratch through it as you would for a hard ground
- Subtle wash-type marks can be created with this ground by diluting parts of the softground while it is wet, and with Greased Lightning or Fantastik (available at Kroger with cleaning materials) when dry.
- A great variety of marks can be made as this relief in softground undergoes its hardening process. As this ink hardens it loses its elasticity, becoming progressively more brittle. Line quality will change depending on how long after the ground has dried you make the drawing. Early lines are smoother, later ones more like drypoint.
Printing a Proof/Edition
- Before inking and printing, remove the ground with Greased Lightning.
- Fantasik (409) will dissolve.
- Wash with cold/cool water - Warm water will dry
Comet, Fantastik will remove
dried ink. Do not use together.
Cannot etch but once. because the water rinse damages the integrity of the
ground.
1 - 1/2 hour etch
To clean plate: Vegetable oil (canola) , degrease with magnesium
carbonate
Draw on Paper on top of Soft Ground
- Draw a design on tracing paper and place it over a plate coated with soft ground). Remember to draw in reverse of the desired outcome.
- Draw through the tracing paper with a hard pencil or ball-point
pen.
- The pressure makes the ground adhere to the tracing paper producing
lines of exposed metal
- Etch the drawing; the line quality of your drawing will result in a soft, textural effect
Soft Ground as Hard Ground
- After a day or two it is dry and works as a hard ground
- The longer the ink is allowed to dry the greater the variety of mark that is possible.
- Fantasik (409) will dissolve.
- forced dry with a hair dryer or overnight curing
Etch Plate:
- Cannot etch but once.
- 1 - 1/2 hour etch
- Blacks are best achieved by progressing from deeply bitten, coarse- textured grounds to shallow delicate ground.
Soft Ground Drawing
- Apply a layer of Crimson Water Soluble Relief Ink to the plate with a roller or brayer.
- Allow it to dry 20 minutes or so, then place a piece of paper on the plate and draw on the paper. It will lift off the ground on the plate as the pen or pencil presses down to make each line.
- Etch the plate.
Reworking Techniques for the Etched Plate
more complete info see Reworking the Etched Plate Handout
Colored ink tips
- When working with colored ink, a solution of 50% Future and 50% water can be used to coat the entire plate. This thin coating does not block up even very fine marks yet serves as an effective barrier for the inks from contamination by the metal
- For printing, more complete info see Printing Handout
Clean Up of Printing Plate and Inking Station
-
Wash with cold/cool water - Warm water will dry
- Vegetable oil (canola) , degrease with magnesium carbonate
- Comet, Fantastik will remove dried ink.